Thanks man for all the helpful comments.
After starting afresh with my own external volume size…
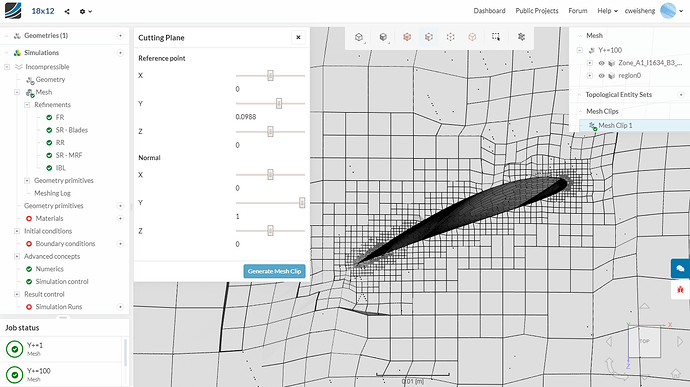
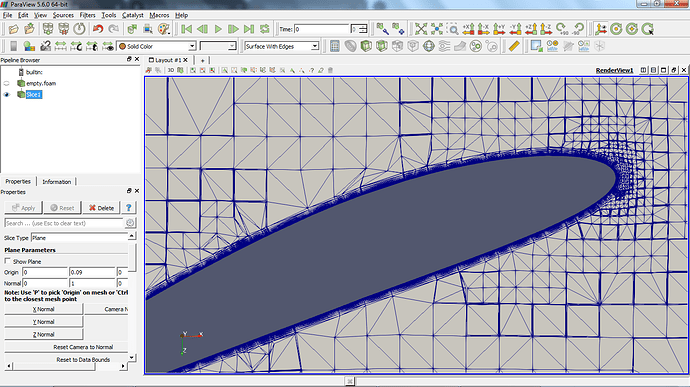
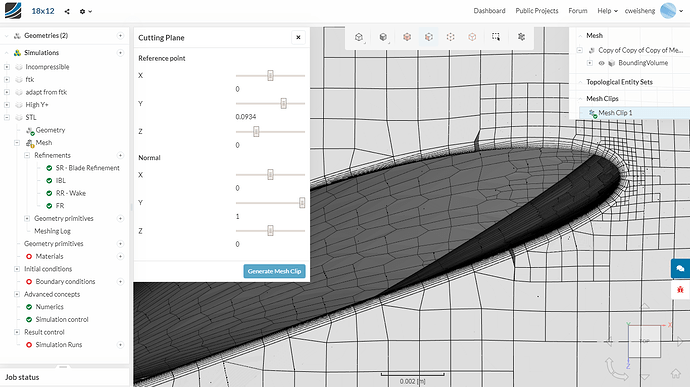
Using paraview… can I say that based on this visualization, there is no BL generated for this (y+=1)?
y+=100 confirm no BL in SimScale Mesh Clip
regenerated y+=1 as I found out I forgot to uncheck the “relative mesh size” in the main mesh settings… unable to visualize in SimScale Mesh Clip and yet to download to paraview. Will have to wait till tomorrow but I am not overly optimistic about it.
Back to the drawing block and changing mesh sizes…
I made some headway but I would like to understand the way the meshing works, if u can help:
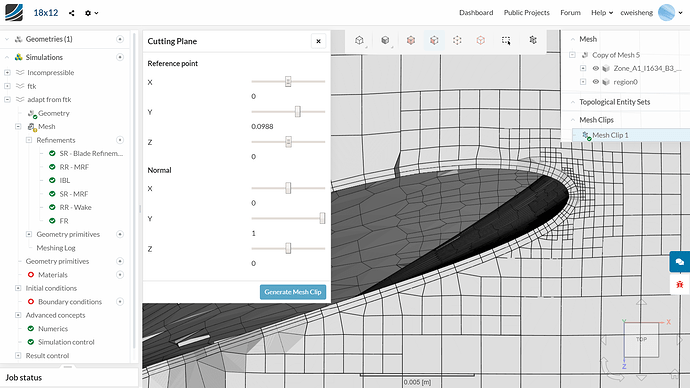
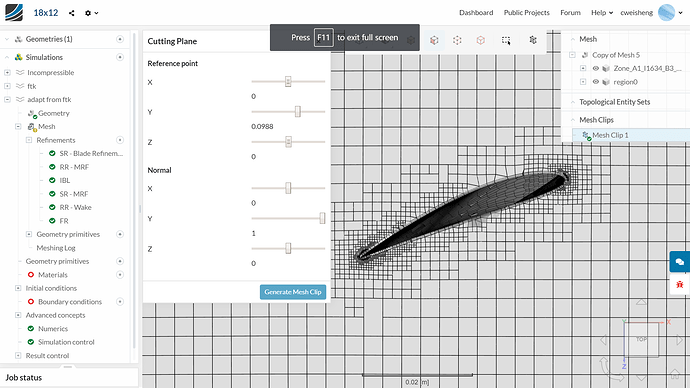
I specified 13 layers to be added but as you see, only about 3 layers max was generated. Is it possible to say what were the issues?
- Like, can it be said the surrounding volume mesh is not fine enough compared to the layer thickness?
- Or is it likely just an issue of mesh quality, eg. aspect ratio of the cells becoming too large?
I am trying out larger number of “cells between levels” in the Castellated Mesh settings.
Hi @cweisheng,
Deletion of layers is due to the quality controls of the mesher. Earlier in this thread I believe I posted the link about layering in SimScale and one of the troubleshooting steps to prevent layer deletion was to decrease the quality control. I’m sure you have done that before as well, is that setting still maintained?
Yes this is also a possible issue. If what I mentioned earlier does not allow you to generate the % of layers needed, then do add a region refinement around that area. That should help in layer generation, but by how much is unknown.
Refer back to my first comment. Yes this is usually the case for layer deletion.
This should not help that much. As mentioned it is the quality controls likely deleting off your layers.
Cheers.
Regards,
Barry
Thanks @Get_Barried. Yeah I did read that before and for good measure, I just re-read that.
I altered the aspect ratio allowed and also the min determinant factor. Got the layers!
Now, just wanna tailor it some more… hope it works. And then to run the first simulation… and hope that the results are good too - gonna compare it to my blade-element momentum results.
Hi @cweisheng,
Looks good. Do you know what your % of layers inflated is? (you can check the meshing log).
Looking forward to the results.
Cheers.
Regards,
Barry
I guess you asked cos you have had lots of experience with potential problems under the hood:
patch faces layers overall thickness
_ [m] [%]_
----- ----- ------ — —
_A1_I1633_B2_TE141_A1_I1633_B2_TE4 1605 0.841 7.6e-05 22.9 _
_A1_I1633_B2_TE141_A1_I1633_B2_TE14 1243 0.828 6.96e-05 21 _
_A1_I1633_B2_TE141_A1_I1633_B2_TE24 5965 0.638 5.12e-05 15.4 _
_A1_I1633_B2_TE141_A1_I1633_B2_TE36 62 1.34 8.04e-05 24.2 _
_A1_I1633_B2_TE141_A1_I1633_B2_TE43 193797 8.22 0.000281 84.6 _
_A1_I1633_B2_TE141_A1_I1633_B2_TE50 277 1.2 8.81e-05 26.5 _
_A1_I1633_B2_TE141_A1_I1633_B2_TE53 2512 1.52 6.22e-05 18.7 _
_A1_I1633_B2_TE141_A1_I1633_B2_TE60 1444 3.7 0.000251 75.5 _
_A1_I1633_B2_TE141_A1_I1633_B2_TE67 1605 0.877 7.92e-05 23.9 _
_A1_I1633_B2_TE141_A1_I1633_B2_TE74 1444 3.63 0.000253 76.2 _
_A1_I1633_B2_TE141_A1_I1633_B2_TE78 1730 2.57 0.000233 70.1 _
_A1_I1633_B2_TE141_A1_I1633_B2_TE80 2625 2.61 0.000171 51.7 _
_A1_I1633_B2_TE141_A1_I1633_B2_TE95 1282 4.69 0.000276 83.2 _
_A1_I1633_B2_TE141_A1_I1633_B2_TE100 1243 0.824 6.91e-05 20.8 _
_A1_I1633_B2_TE141_A1_I1633_B2_TE107 1282 5.06 0.000274 82.6 _
_A1_I1633_B2_TE141_A1_I1633_B2_TE111 5967 0.561 4.26e-05 12.8 _
_A1_I1633_B2_TE141_A1_I1633_B2_TE119 62 1.02 5.23e-05 15.8 _
_A1_I1633_B2_TE141_A1_I1633_B2_TE124 193807 8.26 0.000281 84.6 _
_A1_I1633_B2_TE141_A1_I1633_B2_TE131 277 1.2 8.81e-05 26.5 _
_A1_I1633_B2_TE141_A1_I1633_B2_TE134 2511 1.53 6.26e-05 18.9 _
_A1_I1633_B2_TE141_A1_I1633_B2_TE136 1794 3.43 0.000259 78 _
A1_I1633_B2_TE141_A1_I1633_B2_TE138 2626 3.64 0.000195 58.7
So, the percentage is not fantastic. The cross-section I showed before was around the reference blade position ~75% blade length and it actually formed the full 13 layers I asked for. However, after I put in my “ideal” boundary layer requirements… I am getting truncated boundary layers…
I am a little at the cusp of whether this will work out. Could you share your experience with other meshers (free or commercial)?
I worked with one for the most part of a decade in my previous job and never had so much problems with mesh generation - I was more of a user than a developer- I guess I was pretty sheltered from the true CFD issues. Currently, I am moving into a project and might actually propose for the Client to shell out the money so that we can move forward faster.
Hi @cweisheng,
Yes that is the problem with the current mesher (snappyhexmesh). Powerful but hard to tune to get exactly what you need. Again quality and snapping issues are causing the layers to not be generated.
I suggest trying out cfMesh. It is an automatic mesher, but you will need to figure out how to get it setup. I do not think it requires OpenFOAM to be installed however the GUI version of it will cost money. The free version is as good but without the GUI so you’ll have to mesh via a terminal and check it either using ParaView or something else.
The more conventional meshers are the ones in the Ansys package. ICEM is one of them. Of course these are all paid and you will need to re-learn a couple of things so not sure if its a path you want to take.
Don’t really need to be a developer to know about the meshing behavior ![]() . But it helps. In this case its just the mesher being very difficult to tune. Do try out the other meshers as mentioned. You probably will have better results there.
. But it helps. In this case its just the mesher being very difficult to tune. Do try out the other meshers as mentioned. You probably will have better results there.
Cheers.
Regards,
Barry
I thought I would go ahead to try simulating with the mesh I got at 13 layers… just to see how it goes. But my simulation is blowing up. Just wanna ask a few questions to make sure it is not blowing up because I am setting something wrong (i.e. it is due to poor mesh quality):
- I followed pretty much what I can see from FiliptheKing’s.
- I did amend the air density and viscosity to represent the design conditions of the propeller (eg. flight altitude)
- Now, for the pressure setting in the initial conditions, it is a gauge pressure, which I understand to mean it references another setting. This setting, I thought to be “Pressure reference value” under Numerics. However, I saw this to be set to 0 Pa for FiliptheKing’s. Should this be the flight altitude pressure? And then the initial condition (gauge) pressure value will be 0 Pa.
- For pressure outlet, I set it as 0 Pa.
Does these sound about right? Most wanted to clarify #3.
Thanks!
Hi @cweisheng,
Which simulation are you referring to?
Yes, all 0 is fine. There is no need to indicate this for a simple incompressible simulation.
Cheers.
P.S Realized you’re from Singapore, I am too so hello!
@Get_Barried, good to link up since we are countrymen! That’s rare too!
I might have made some headway though still not 100% applicable. I decided to use a high density STL to try (previously was using IGES).
This is the result I got for my “ideal” mesh:
patch faces layers overall thickness
[m] [%]
solid_0_stl_solid 293784 10 0.000309 93.1
The problem with using STL is that I was only able to generate the propeller geometry and not the surrounding volume for MRF. Haven’t got around to trying… does anyone know if I can use a geometry primitive for the surrounding volume for MRF, AND one for the outer farfield boundaries?
Thanks.
Hi @cweisheng,
Looks pretty good. I’ve been exploring cfMesh and attempting to mesh the other topic where Dale and others were discussing. That geometry is giving me issues so I think I will move on yours and attempt to run it through cfMesh to see if I can get a better quality.
I don’t believe you can use the geometry primitive. Not exactly sure though. I’ve always generated my MRF volume through CAD.
As for the outer farfield boundaries, that should be possible as it is effectively just the bounding box.
Cheers.
Regards,
Barry
Thanks @Get_Barried.
Alright, so the mesh from the STL really does look good after I did a couple more cross-sections. However, this is infuriating as I am trying to do a MRF and so I need another volume around it for the MRF. After experimentation, I do need this volume to be imported together in the CAD, which unfortunately 2 solids, with 1 inside the other, is not compatible with STL! ARGH.
@jousefm or anyone at SimScale able to help here???!
I did another based on STEP geometry, it was good too but not as good as the STL one. i.e. the prism layers did not form as comprehensively as the STL one.
So, it seems for me, in terms of prism layer formation percentage
STL > STEP > IGES
for imported CAD geometry format. Will post some pictures tomorrow.
@cweisheng: I use near exclusively STL for my geometries, 80% of them have defined MRF volume, rotor, propeller or whatever being inside and never had problem with it. Why it would be incompatible, please?
Cheers,
Retsam
Hi @Retsam
Great to find a relevant expert!
I guess I would like to ask which CAD software you are using, and how do you export both geometries, the rotor and the MRF volume as one STL (or not, and if not, how do you import and work into SimScale)? Would it be possible to share your workflow in some detail? I am sure it is just my ignorance.
Thanks!
Hi both,
I would be interested to know the workflow for generating a MRF volume in STL as well. Snappy and cfMesh both prefer the STL format (though cfMesh does like another format called fms) so knowing how to generate it would be great.
Looking forward to your reply.
Cheers.
Regards,
Barry
@Get_Barried and @cweisheng: take a look at one of geometry I use in Magnus effect Project:
Geometry: CylRotSlim
Simulation: CylRotMenium
Geometry contains ‘solid_0’ composed with ‘ascii’ and ‘ascii_1’ bodies. MRF zone definition is as near as possible to rotating body.
I did filetted the edges to avoid high gradients with air moving (shear) in standing still air (whole BMB).
Now, I did it in Fusion, with ‘export’ to STL. This is old Fusion and I cannot tweak the resolution of STL mesh there.
@cweisheng you can export / import that geometry to you CAD tool and see how your CAD will handle those bodys. Switch the visibility of one or another, you should be able to handle it without problem.
Cheers,
Andrzej
I said I used Fusion, but I prepare to use OnShape. My first test with STL shows, that OnShape merges parts.
  facet normal -1 0 0
    outer loop
      vertex 0.00169513 0.0397737 0.014
      vertex 0.00169513 0.0397737 0.03
      vertex 0.00169513 0.0505397 0.03
    endloop
  endfacet
  facet normal -0.956526 0.267466 0.116272
    outer loop
      vertex -0.0401284 -0.00153045 0.0202347
Above, second element ‘Facet normal’ belongs to another part.
First part stops with first ‘Facet normal’ element.
There is no name attribute to separate both parts. So possibly no way to discover different parts while parsing that text file. Too bad. 
You can export those parts in separate files: final format is in ZIP. Than I would need to write a script to merge those parts in one STL file, with elements attributes indicating different names.
The current work around to STL file merging intersecting geometry is simply concatenate them (text files). You can also , in text editor, edit name of the solid;
solid Blurb
  facet normal 1.632797e-002 -1.240232e-001 -9.921450e-001
Above I replaced ‘ascii’ with ‘Blurb’. Simscale will respect it. If all solids are named ‘ascii’, Simscale will increment the name with ‘_1, _2, …’. 
That sounds very smart! I guess what you are saying is to combine 2 STL files, each with 1 of the Solids…
Ok, I just need to find out how to do that as I am not familiar with the process you mentioned. But thanks!
Edit:
- awesome. previously i was saving as binary so the file was not readable. but i saw the ascii option and that is readable (in notepad++)
- so i did as i think you meant, i appended one file (with one solid) to the other (with the other solid) and renamed them
- i checked them in Fusion and I do see 2 bodies
- I imported them into SimScale - it was one solid but 2 i-dont-know-what (faces?) that i was able to select for meshing based on mrf and propeller. it’s meshing now… so fingers crossed. still, great hack! will update if it works.

